|
|
|
|
 |
 |
 |
|
Part 1: Animating Phase
|
Start Adobe After Effects.
Make a new composition. 640*480 29.97fps. 4 seconds long. Name it "Phase Animated".
Create a new white comp-sized solid.
Apply Effect>Trapcode>Shine to the layer.
Open the Pre-Process group.
Check Use Mask
Set Feather to 200.
Set Ray Lenght to 6.
|
 |
|
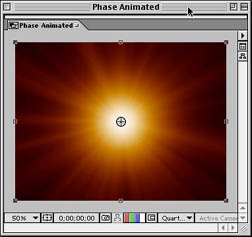
The comp window should now look something like this:
What we have done so far is to use the mask to cut out a circular disc from the white solid.
|
 |
|

| |

|
| |
|
|
|
| |
|
|
|
|
Making a seamless loop
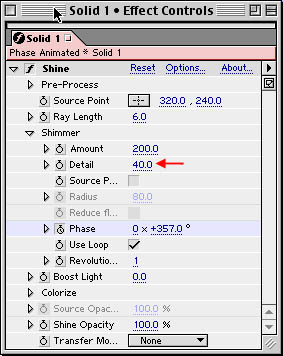
Set a keyframe at the first frame (time 00:00) for Phase with the value 0 Revolutions and 0 degrees.
Move to time 04:00 and set another keyframe with the value 1 Revolution and 0 degrees. It is important that this last keyframe is at 04:00 (not 03:29) to make the loop seamless.
Check the Use Loop checkbox.
Leave Revolutions in Loop to the default 1.
If you want to make a faster animation, set a higher value for the second keyframe, and adjust Revolutions in Loop accordingly. To make a slower loop, make the composition longer and move the last keyframe. You need atleast one whole revolution to make a seamless loop.
Press RAM preview to see the seamless loop.
|
 |
| |
| |
|
| |
|
|
|
| |
|
|
|
Part 2: Animating Source Point
|
Make a new composition. 640*480 29.97fps. 2 seconds long. Name it "Source Point Animated".
For the setup we take exactly the same steps as above. Here is a quick recap:
Create a new white comp-sized solid.
Apply Effect>Trapcode>Shine to the layer.
Open the Pre-Process group.
Check Use Mask
Set Feather to 200.
Set Ray Lenght to 6.
|
|
|
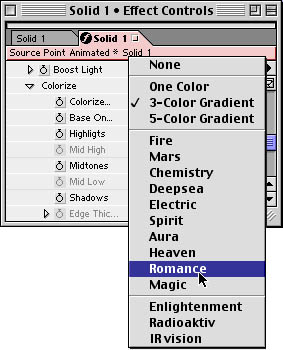
For a little variation, let's change the colors. Open the Colorize group and select the Romance colormap.
|
 |
|
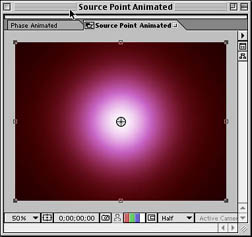
The comp window should now look something like this:
|
 |
| |
| |
|
| |
|
| |
|
|
|
|
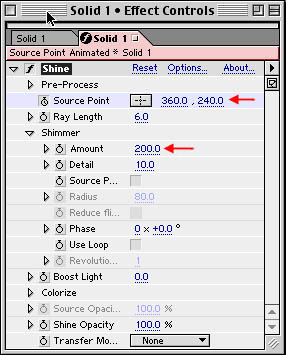
Now, we will animate the Source Point . At the first frame, set a keyframe with value (320,240).
At the last frame (time 01:29) set a keyframe with the value (360,240).
Set Amount to 200.
Press RAM Preview to view the animation.
|
 |
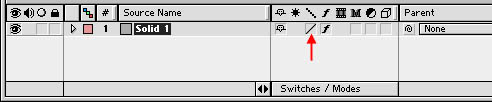
You might notice that it looks a bit jerky. Then you need to flip the layer to high quality as shown in the picture below to make the Source Point sub-pixel accurate.
Press RAM Preview to view the smoother animation.
|
OK, it still does not look very exciting since the shimmer stays static as the light moves.
To make it really shimmer, check the Source Point affects Shimmer checkbox.
Press RAM Preview again to see how it shimmers as it moves.
|
 |
|
As you might have seen a new slider was enabled when checking Source Point affects Shimmer . This is called Radius and it controls how fast the shimmer should "pass by" when moving the Source Point.
Try setting it down to 40 and press RAM Preview again.
Notice that now it shimmers faster. The smaller the radius, the faster the shimmering (assuming the Source Point animation path is constant).
One could say that this setting controls at which radius (from the Source Point) the shimmer is created.
When doing logo- or text-work using shimmer it can be a good idea to set the Radius so it is approximately the same as half the height of the logo.
Also, when doing logo-work and using shimmer the result can get flickery. Then the Reduce flicker checkbox can be used to make it smoother.
Sometimes even this does not look good enough, then animate the Phase instead (as explained in Step 1 of this tutorial) or simply leave the shimmer static - since the logo itself will affect the rays there will be automatic shimmering assuming the Source Point is animated.
|
 |
|
|
|
|
|
|

|
©2001 Trapcode.
|
|