Shine Documentation: (( manual )) logo lightsweep tutorial shimmer tutorial
Shine Manual

Shine is a radial light effect plug-in for Adobe After Effects. It can be used to create lights that sweep through logotypes or any kind of footage. It has built-in transfer modes and numerous colorizing modes. It also features special controls to make shimmering lights.

To the left is a picture of the Shine effect controls as they appear when the plug-in is initially applied.

 
Shine licensing

Shine is distributed as an unlockable demo. You can buy an unlocking key here. When you receive your key, enter it to the plug-in by pressing "Options" and then "Enter Key...".

 
Pre-Process

In the Pre-Process group are the functions that can be applied before the actual shine is performed.

Threshold is used to isolate the brighter areas of the image and let only them be affected by the plug-in. (Transfer Mode Add is used in theese illustrating images)
Original image Threshold zero
Threshold medium Threshold high


Use Mask is used to isolate a circular area around the Source Point and let only that area be affected by the plug in. The settings are Radius and Feather (both in pixels).
Mask off Mask on

 
Source Point and Ray Length

Important: When animating the Source Point slowly, the layer that Shine is applied to should be switched to high quality in order to make the Source Point sub-pixel accurate.

Source Point sets the center point for the effect, the point from where the rays shoot out.

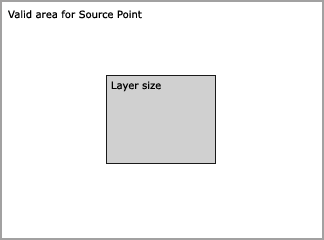
It can be placed outside the layer, but will not move further than one layersize in each direction as illustrated on the left.

Ray Length controls how far the rays shoot out. Note that this setting has no influence on render time.
Short Ray Length Long Ray Length

 
Shimmer

The Shimmer group contains controls to make the light "shimmer". Here this means that the ray length is modulated by an animatable fractal so that the rays seem to move in and out and sideways.
 

Amount sets how much influence the shimmer has.

Detail sets how fine details the shimmer has.

Low Detail High Detail

There are two ways to make shimmer animate: Either check the Source Point affects Shimmer checkbox, or animate the Phase control.

Source Point affects Shimmer means that as the Source Point is moved, the shimmer will automatically animate in a way that looks natural for the movement. The Radius setting controls how much shimmer animates when moved a certain distance. A low setting will give a fast animation and a high setting will give a slower animation. Sometimes, especially when working with a logotype, this setting can give a flickery result. Then the Reduce flicker checkbox can be used. If it still does not look satisfactory, uncheck Source Point affects Shimmer and let the shimmer be still or animate Phase instead.

Phase controls the phase of shimmer. Animating this makes shimmering move randomly. To make a seamless loop, check the Use Loop checkbox and set Revolutions in Loop to the desired amount.

For example: if the loop should be 4 seconds long and consist of two whole phase revolutions then set two keyframes for Phase, one with value 0 (zero) at time 0 (zero). Then set one with value 2 at time 4 seconds. Make sure the last frame (the one at 4 seconds) is not included in the loop. If this was included there would be two identical frames following each other. Set Revolutions in Loop to 2.

 
Boost Light

Boost Light is used to brighten up the image. It can go very high so it totally burns out the image which could be used for transitions.
No Boost Medium Boost
High Boost

 
Colorize

The Colorize group contains controls to set the coloring of the effect.
 

The Colorize... pop-up can be set to:

  • None - No coloring is performed. The colors of the source image are used. This should be used for example when simulating the light shining through stained glass, or shooting out from a multicolored logotype.
  • One Color - With this setting one single color can be picked and the entire effect is colorized in that color.
  • 3-Color Gradient - Three colors, Highlights, Midtones and Shadows can be selected.
  • 5-Color Gradient - Five colors can be selected.
None 3-Color Gradient

After theese follow the 3-Color Gradient presets. When one of the presets is selected, the three colors are updated (Highlights, Midtones and Shadows). If the colors are tweaked, the pop-up goes back to the "3-Color Gradient" mode to indicate that the preset is no longer used.

Fire Mars Chemistry
Deepsea Electric Spirit
Aura Heaven Romance
Magic

After theese follow the 5-Color Gradient presets. When one of the presets is selected, the five colors are updated. If the colors are tweaked, the pop-up goes back to the "5-Color Gradient" mode to indicate that the preset is no longer used.

Enlightenment Radioaktiv IR vision

Base On... This pop-up menu is active in any colorizing mode except None. It selects what channel should be used as input. The possible choices are:

  • Lightness - Use lightness values.
  • Luminance - Use luminance values.
  • Alpha - Use alpha channel.
  • Alpha Edges - Use the edges of the alpha channel. When this mode is active, a new slider at the bottom of the colorizing group is enabled. This is called Edge Thickness and controls how thick the alpha edges should be.
  • Red - Use red channel.
  • Green - Use green channel.
  • Blue - Use blue channel.
Alpha Alpha Edges
Low Thickness
Alpha Edges
High Thickness
 
Transfer Modes and Opactiy

Shine has a built-in Transfer Mode pop-up menu so it can composite the "shined" image onto the source image. Source Opacity sets the opacity (the opposite of transparacy) of the source. Shine Opacity sets the opacity of the effect. Below are examples of some of different Transfer Modes (they are the same as used by Adobe After Effects).

Source image None Normal
Add Color Dodge

  ©2001 Trapcode.